When building or upgrading a heavy-duty electrical system—whether it’s for a marine vessel, an off-grid solar array, a custom RV, or a classic car restoration—the integrity of your battery connections is paramount. A single weak link can lead to voltage drops, component damage, or even catastrophic electrical fires.
Among the various connectors available, the 90 degree battery terminal and 90 degree battery lugs are indispensable for tight spaces where straight runs are impossible. They allow for clean cable routing and prevent destructive bending stress on the cable strands.
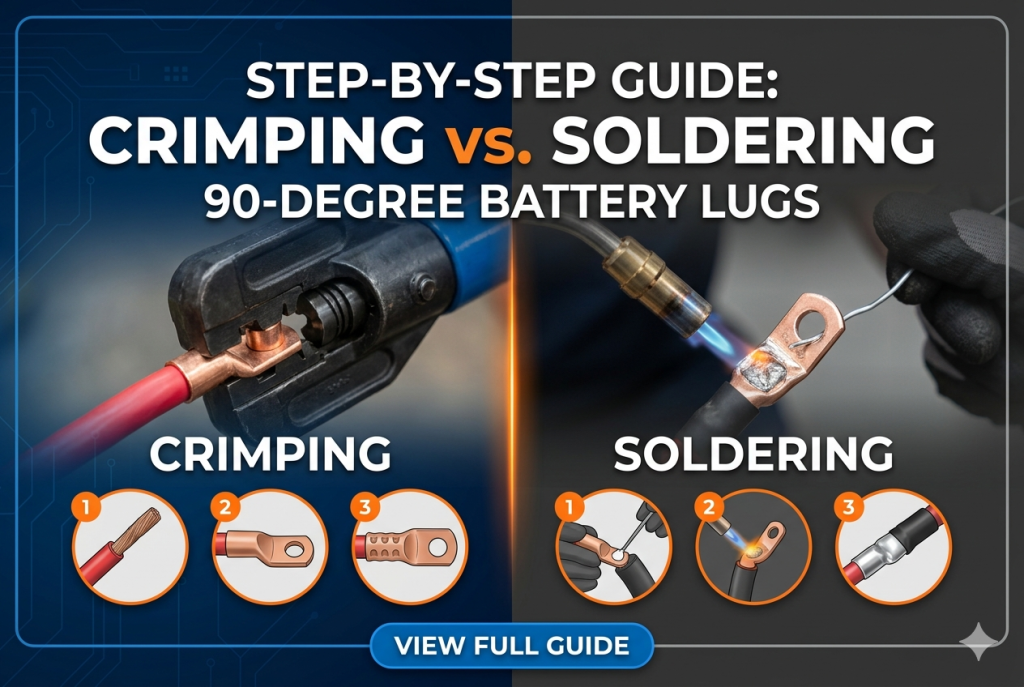
But once you have selected your 90-degree hardware, a classic debate arises: Should you crimp or solder? This comprehensive guide breaks down the mechanics of both methods, weighs their pros and cons, and provides a step-by-step walkthrough for executing each technique flawlessly.
Understanding the Contenders: Crimping vs. Soldering
Before picking up your tools, it is crucial to understand what each method actually does to the wire and the lug.
What is Crimping?
Crimping is a mechanical process that uses a specialized tool to compress the barrel of the lug around the stranded copper wire. Under thousands of pounds of pressure, the air gaps between the wire strands are eliminated, cold-welding the copper together into a single, solid mass.
What is Soldering?
Soldering is a thermal and chemical process. It involves heating the lug and wire until they can melt a filler metal (solder). The liquid solder flows into the gaps between the wire strands via capillary action, bonding the wire and the lug together as it cools.
The Pros and Cons
| Feature | Crimping | Soldering |
|---|---|---|
| Mechanical Strength | Excellent. Resists vibration and pulling forces. | Good, but can become brittle under extreme vibration. |
| Corrosion Resistance | Excellent if sealed with adhesive-lined heat shrink. | High, but improper flux cleanup can cause internal corrosion. |
| Tool Investment | Requires specialized, often expensive crimpers. | Requires a high-output torch or heavy-duty soldering iron. |
| Skill Requirement | Low to medium. Consistency is easy with the right tool. | High. Overheating or underheating ruins the joint. |
The Verdict for 90-Degree Lugs: In automotive, marine, and industrial applications, crimping is the industry standard. Soldering stiffens the wire right at the joint, making it prone to snapping under vibration. However, soldering is a viable alternative if you lack access to a heavy-duty hydraulic crimper.
Method 1: The Step-by-Step Guide to Crimping
Crimping a 90 degree battery terminal requires a tool capable of exerting massive force. For heavy-gauge wire (like 2/0 or 4/0 AWG), a hydraulic or heavy-duty compound leverage crimper is mandatory.
Tools and Materials Needed:
- Battery cable (correct gauge)
- 90 degree battery lugs (matching the wire gauge and stud size)
- Cable cutters and a wire stripper (or a utility knife)
- Heavy-duty mechanical or hydraulic crimping tool
- Adhesive-lined heat shrink tubing
- Heat gun
Step 1: Measure and Cut the Cable
Determine the exact path your cable will take. Because you are using a 90-degree lug, orientation matters. Cut the cable cleanly using high-quality cable cutters to avoid distorting the circular shape of the wire.
Step 2: Strip the Insulation
Insert the cable into the barrel of the 90-degree lug to gauge how much insulation needs to be removed. Strip just enough insulation so that the wire bottoms out in the lug barrel, leaving no more than $1/16$ of an inch of exposed copper between the insulation and the lug.
Step 3: Prep and Orient the Lug
Slide your adhesive-lined heat shrink tubing onto the cable before you attach the lug. Next, slip the 90 degree battery terminal onto the bare copper strands. Crucial Tip: Twist the lug into its final mounting orientation relative to the other end of the cable. Once crimped, you cannot twist the wire inside the lug.
Step 4: Execute the Crimp
Place the lug barrel into the correct die size of your crimper. If you are using a hydraulic crimper, pump until the relief valve releases or the dies fully close. For large 90-degree lugs, a double crimp (one near the pad, one near the wire entry) is often recommended.
Step 5: Seal with Heat Shrink
Slide the heat shrink tubing up over the crimped barrel, ensuring it covers at least an inch of the cable insulation. Apply heat uniformly until the tubing shrinks tightly and the internal adhesive oozes slightly from the edges.
Method 2: The Step-by-Step Guide to Soldering
Soldering heavy-gauge 90 degree battery lugs requires a lot of thermal mass. A standard electronics soldering iron will not work; you will need a propane or butane torch.
Tools and Materials Needed:
- Battery cable and 90-degree lug
- 60/40 Rosin-core solder (Do not use acid-core plumbing solder)
- Rosin flux paste
- Propane torch or heavy-duty soldering iron
- Vise or clamping system
- Wet rag and safety glasses
Step 1: Prep and Flex
Strip the wire as detailed in the crimping section. Because solder relies on chemical bonding, clean copper is non-negotiable. Dip the exposed wire strands into rosin flux paste to help the solder flow and prevent oxidation when heated.
Step 2: Secure the Lug
Secure the pad of the 90-degree lug in a bench vise. Position it so the barrel points upward like a small cup. Drop your pre-measured heat shrink tubing onto the cable far away from the heat zone.
Step 3: Heat the Lug
Introduce the cable into the vertical barrel. Begin applying heat with your torch to the base of the lug barrel, not directly to the copper wire. Heating the lug ensures that the metal reaches the melting point of the solder uniformly.
Step 4: Feed the Solder
Touch the solder wire to the seam where the copper wire enters the lug barrel. Once the lug is hot enough, the solder will instantly liquefy and be drawn down into the barrel. Keep feeding solder until the barrel is filled to the top, but stop before it overflows down the outside of the lug.
Step 5: Cool and Insulate
Immediately remove the heat and hold the cable completely still until the solder solidifies (it will change from shiny to a dull silver). Wipe the joint with a wet rag to cool it and remove flux residue. Once completely cold, slide the heat shrink over the joint and seal it.
Final Thoughts: Protecting Your Connection
Regardless of whether you choose to crimp or solder your 90 degree battery lugs, the true secret to longevity is the final environmental seal. Moisture is the enemy of copper; it sneaks into unsealed terminals, causing green corrosion that degrades electrical conductivity over time. By combining a precise mechanical crimp or thermal solder with marine-grade, adhesive-lined heat shrink, your custom 90-degree battery cables will reliably deliver maximum amperage for years to come.